The post How to use OpenVPN over an IP over ICMP tunnel (Hans) appeared first on nethack.
]]>The very first question may is why to tunnel IP over ICMP at all?
Sometimes you may find yourself in a situation where you have network, but no access to the Internet because of annoying restrictions. That f.ex. could be a proxy which requires authentication, a captive portal like in hotels or the ports you need simply are not open. As long you can ping hosts in the Internet you have the possibility to use Hans (IP over ICMP) to get around this restrictions. One problem that still could arise is that the local firewall implements some kind of ICMP flooding protection and your clients is getting blocked because Hans generates too much ICMP traffic (and it will definitely produce quite a lot of them).
IMPORTANT: Hans doesn’t do any encryption! That’s why i want to pipe my OpenVPN connection through it.
How to setup an OpenVPN server with certificates and Two-Factor Authentication you can find in my last post.
This post explains the additional steps required to make it work. So you may should have a look at the post first before continuing.
On a Linux system you can compile the client the same way we do for the server in the next step. For OS X and Windows there’s a binary available on the Hans website: http://code.gerade.org/hans/ .
Download the source, compile it and copy the binary:
https://netcologne.dl.sourceforge.net/project/hanstunnel/source/hans-1.0.tar.gz tar xfz hans-1.0.tar.gz cd hans-1.0 make cp hans /usr/local/sbin/
Martin Hundebøll provided a Systemd script to start up the service at boot time, and i modified a bit to fit my needs.
Create the file /etc/systemd/system/hans.service and add this:
[Unit] Description=ICMP Tunneling Daemon After=syslog.target network.target [Service] Type=forking EnvironmentFile=/etc/hans/hans.conf Restart=on-abort ExecStart=/usr/local/sbin/hans -s $HANS_IP -d $HANS_DEV -m $HANS_MTU -u $HANS_USER -p $HANS_PASS [Install] WantedBy=multi-user.target
Put the following content into /etc/hans/hans.conf :
HANS_IP=10.22.33.0 HANS_DEV=tun99 HANS_USER=nobody HANS_PASS=<a not to short password> HANS_MTU=1500
HANS_IP: A subnet which is used within the tunnel for communication (make sure that it’s different from your existing OpenVPN subnets)
HANS_DEV: The tun device it should use. As i use lower tun numbers for OpenVPN i set it to tun99
Because the configuration contains the password in plain text, make it readable by root only:
chown root:root /etc/hans/hans.conf chmod 600 /etc/hans/hans.conf
Now enable and start Hans:
systemctl enable hans systemctl restart hans
To start it up on my Mac i use this simple command:
sudo ./hans -c your.server.com -m 1500 -p <the password you defined on the server>
Now you should be able to ping the server side:
ping 10.22.33.1
If your IP over ICMP tunnel is up, it’s time to configure OpenVPN.
It turned out that it was not as easy than i thought first because there are two tunnels involved and they begin to interfere with each other if the routing is not set correctly.
DISCLAIMER: I don’t know if the solution below is the best, but it was the only one which made my setup work the way i want. If you found a better solution, please add a comment below.
I had to make a separate OpenVPN configuration which doesn’t forward everything through the tunnel because this killed the IP over ICMP tunnel. The only change to the original OpenVPN configuration i used in my last post was to comment out the line which pushes the default route to the client:
# push "redirect-gateway def1 bypass-dhcp"
NOTE: Make sure to have a different IP range, port and tun device configured as explained it the post mentioned above, as well as set all firewall rules (masquerading).
Fire up the new instance of the OpenVPN service and then the last thing we have to do is the client config.
There are three options which are different from the configuration used for a normal OpenVPN connection. Please, again, have a look at the previous post for details.
The options you have to change are:
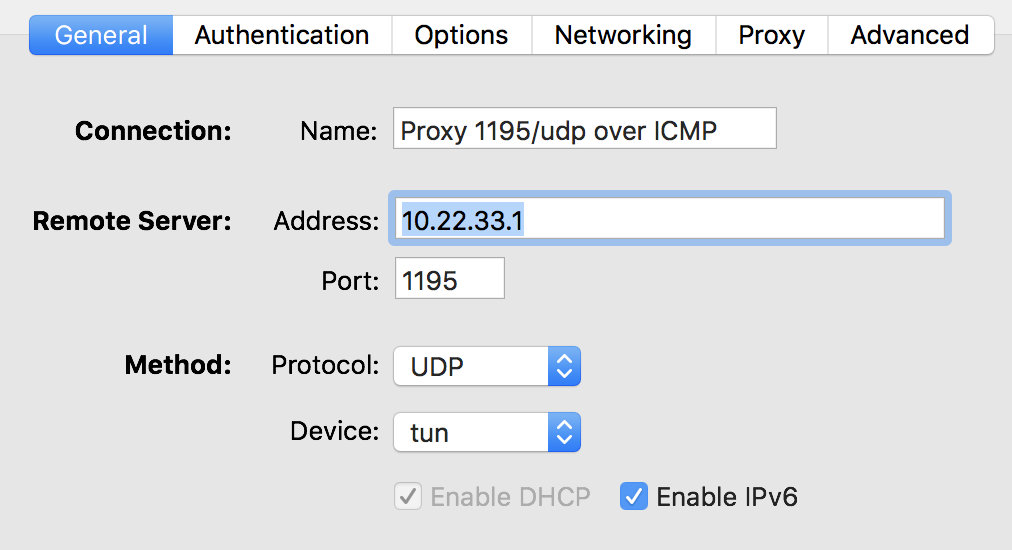
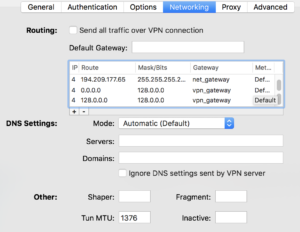
The last two routes are a bit special and a little workaround. Let me explain:
If i overwrite the default route in any way i tried, it broke the IP over ICMP tunnel. So i created two /1 networks which cover all IPv4 adresses, and because they are smaller than the default route (0.0.0.0/0) they have a higher priority. I’m sure there’s a better and cleaner way to do it, but i wasn’t able to find out how.
Now you should be able to connect your OpenVPN tunnel through the IP over ICMP tunnel. I could achieve up to 5 MBit/s which isn’t very much, but not too shabby if the other option would be to have no Internet at all or to have to pay for it…
The post How to use OpenVPN over an IP over ICMP tunnel (Hans) appeared first on nethack.
]]>The post Setup an OpenVPN server with certificate and two-factor authentication on CentOS 7 appeared first on nethack.
]]>My goal was to have an OpenVPN server running, to which i can connect using different ports and by pipping it over an IP over ICMP tunnel (the latter will follow in another post).
Ports i want to use:
You may also want to add port 443/tcp for example as another option. This is quite easy to achieve thanks to Systemd on CentOS 7.
First make sure you have the EPEL repository installed (i’m sure you will find out how).
(If you now think about disabling SELinux, stop here and install Windows…)
Allow the OpenVPN service to run on another than the default port (53/udp in my case):
semanage port -a -t openvpn_port_t -p udp 53
To view which ports are currently allowed use this command:
semanage port -l | grep openvpn_port_t
Simpel:
yum install openvpn easy-rsa
cd /etc/openvpn mkdir rsa cp -rf /usr/share/easy-rsa/2.0/* /etc/openvpn/rsa
Set all the values needed to generate the certificates within /etc/openvpn/rsa/vars:
export KEY_SIZE=4096 export CA_EXPIRE=3654 export KEY_EXPIRE=3654 export KEY_COUNTRY="CH" export KEY_PROVINCE="ZH" export KEY_CITY="City" export KEY_ORG="Organization" export KEY_EMAIL="me@example.com" export KEY_OU="" export KEY_NAME="Cert Name"
Load the values we just set and build all the certificates we need:
source ./vars ./clean-all ./build-ca ./build-key-server server ./build-dh ./build-key <username>
cd /etc/openvpn # Choose a config name which represents the settings you will use (you will have to copy this config later if you want to have it running on other ports) cp /usr/share/doc/openvpn-2.3.13/sample/sample-config-files/server.conf /etc/openvpn/port1194udp.conf
Now open the OpenVPN configuration (/etc/openvpn/port1194udp.conf) and set all these values:
port 1194 proto udp6 # If you have and want to use IPv6 dev tun12 # Set an approriate number (i use the same as for the third octet of the IPv4 addressed used WITHIN the tunnel) ca rsa/keys/ca.crt cert rsa/keys/server.crt key rsa/keys/server.key # This file should be kept secret dh rsa/keys/dh4096.pem server 10.11.12.0 255.255.255.0-0 # The subnet which is used within the tunnel (will be NAT'ed later) push "redirect-gateway def1 bypass-dhcp" # Route all the traffic through the tunnel push "dhcp-option DNS 208.67.222.222" # DNS servers to use after connection push "dhcp-option DNS 208.67.220.220" # The IPv6 subnet used within the tunnel server-ipv6 2001:aaaa:bbbb:12::/64 tun-ipv6 push tun-ipv6 ifconfig-ipv6 2001:aaaa:bbbb:12::1 2001:aaaa:bbbb:12::2 # Push two IPv6 routes to route all the IPv6 traffic through the tunnel (::/0 will not work in most cases) push "route-ipv6 8000::/1" push "route-ipv6 ::/1" # Only works if you have OpenVPN >= 2.4 (not tested as i use 2.3.x at the moment) # push "dhcp-option DNS6 2620:0:ccc::2" # push "dhcp-option DNS6 2620:0:ccd::2" cipher AES-256-CBC comp-lzo user openvpn group openvpn # Use PAM to validate the user and check the two-factor authentication< plugin /usr/lib64/openvpn/plugins/openvpn-plugin-auth-pam.so openvpn
(If you want to install iptables, seriously, think about to move to Windows… )
Open the ports used for OpenVPN (The ones YOU finally will use):
firewall-cmd --permanent --add-service=openvpn firewall-cmd --permanent --add-port=53/udp # Or --add-service=dns firewall-cmd --permanent --add-masquerade # For IPv6 (replace "ens192" with your interface name and "tun0" with your "tunX" interface name) firewall-cmd --direct --add-rule ipv6 nat POSTROUTING 0 -o ens192 -j MASQUERADE firewall-cmd --direct --add-rule ipv6 filter FORWARD 0 -i tun0 -o ens192 -j ACCEPT firewall-cmd --direct --add-rule ipv6 filter FORWARD 0 -i ens192 -o tun0 -m state --state RELATED,ESTABLISHED -j ACCEPT firewall-cmd --reload
Add the following config to /etc/sysctl.conf:
net.ipv4.ip_forward = 1 net.ipv6.conf.all.forwarding = 1
And apply it:
sysctl -p
There’s no Google Authenticator package available for CentOS 7 (end 2016), but the package from Fedora 23 works just fine (check for the most current version!)
wget http://mirror.switch.ch/ftp/pool/4/mirror/fedora/linux/releases/23/Everything/x86_64/os/Packages/g/google-authenticator-1.0-0.gita096a62.fc23.5.x86_64.rpm yum install google-authenticator*
NOTE: Use the user and settings exactly as described below. PAM is very very sensible to wrong permissions and will block authentication if permissions and users are not set correctly.
Add the user to run google-authenticator as and set the correct permissions:
useradd gauth mkdir /etc/openvpn/google-authenticator chown gauth:gauth /etc/openvpn/google-authenticator && chmod 700 /etc/openvpn/google-authenticator
To allow updates of the users Google Authenticator config we have to set this additional SELinux context:
semanage fcontext -a -t openvpn_etc_rw_t -ff '/etc/openvpn/google-authenticator(/.*)?'
To make generating of Google Authenticator codes easier i wrote this script (/root/create-gauth.sh):
#!/bin/sh # Parse arguments USERNAME="$1" if [ -z "$USERNAME" ]; then echo "Usage: $(basename $0) <username>" exit 2 fi # Set the label the user will see when importing the token: LABEL='OpenVPN Server' su -c "google-authenticator -t -d -r3 -R30 -W -f -l \"${LABEL}\" -s /etc/openvpn/google-authenticator/${USERNAME}" - gauth
Make it executable:
chmod 700 /root/create-gauth.sh
Create a new user and its password, and generate the GA token:
useradd -s /sbin/nologin <username> passwd <username> /root/create-gauth.sh <username>
The output will be like this:
https://www.google.com/chart?chs=200x200&chld=M|0&cht=qr&chl=otpauth://totp/OpenVPN%2520Server%3Fsecret%3DZXHPDSSKDGTWFEPE</p> <QR Code> Your new secret key is: YAHTTODJA2XGMUXM Your verification code is 336641 Your emergency scratch codes are: 20222169 93516211 27775127 19957829 95145865
Install the GA token using the QR code or entering the secret manually.
Create the file /etc/pam.d/openvpn and add this configuration:
#%PAM-1.0 auth [user_unknown=ignore success=ok ignore=ignore default=bad] pam_securetty.so auth required /lib64/security/pam_google_authenticator.so secret=/etc/openvpn/google-authenticator/${USER} user=gauth forward_pass auth include system-auth account include system-auth password include system-auth
Enable and start OpenVPN:
systemctl enable openvpn@port1194udp.service systemctl start openvpn@port1194udp.service
Now it’s time to test if everything works fine.
Copy all required certificates to your client (“ca.crt”, “<username>.key” and “<username>.crt”).
Create a new OpenVPN config on your client, add the certificates and modify the config as i have it in my Viscosity client:
NOTE: 192.168.23.0 is my local network i don’t want to be routed through the tunnel.
NOTE: To enter the GA token you have to enter you password followed by the code (<password><token>)
Now try to connect and hope everything is fine. If the authentication fails, check these logs:
If you want to run it on multiple ports you can do two things:
Tasks you have to do to have an additional instance:
The post Setup an OpenVPN server with certificate and two-factor authentication on CentOS 7 appeared first on nethack.
]]>The post Check if the certificate of a domain was revoked appeared first on nethack.
]]>Well done, but two problems:
So i quickly created a bash script to address these issues and do all the stuff much more easily.
It takes one to three options:
Download: checkcertcrl.sh
#!/bin/bash if [ -z "$1" ]; then echo "Usage: $0 <domain> [<keepfiles (0/1)>] [<trusted CA file bu<a href="https://nethack.ch/wp-content/uploads/2016/08/checkcertcrl.sh_.gz" rel="">checkcertcrl.sh</a>ndle path>]" exit 1 fi DOMAIN=$1 KEEPFILES=0 if [ "$2" = "1" ]; then KEEPFILES=1 fi LOCALCAFILE="" if [ ! -z "$3" ] && [ ! -f "$3" ]; then echo "ERROR: The file \"${3}\" does not exists. It must point to a file containing your local trusted CAs. For CentOS f.ex. it's \"/etc/pki/tls/certs/ca-bundle.crt\" by default." exit 1 else if [ -z "$3" ]; then # Check if the default CentOS CA bundle exists and use this if no other file was specified if [ -f "/etc/pki/tls/certs/ca-bundle.crt" ]; then LOCALCAFILE="/etc/pki/tls/certs/ca-bundle.crt" fi else LOCALCAFILE="$3" fi fi # Get the domain certificate echo -n " Get domain certificate: " openssl s_client -connect ${DOMAIN}:443 -servername ${DOMAIN} 2>&1 < /dev/null | sed -n '/-----BEGIN/,/-----END/p' > ${DOMAIN}.cert.pem echo "OK" echo -n " Get the CRL file: " # Get CRL URL from cert and download it CRLURL=<code>openssl x509 -noout -text -in ${DOMAIN}.cert.pem | grep -A 4 'X509v3 CRL Distribution Points' | grep URI | cut -d':' -f 2-10</code> # Check if a CRL URL was returned and exit if not if [ "$CRLURL" = "" ]; then echo -e "ERROR: No CRL URL found in certificate. Verification not possible.\n Could be that it's OCSP only." exit 1 fi wget --quiet -O ${DOMAIN}.crl.der $CRLURL if [ $? -ne 0 ]; then echo "ERROR: Failed to download CRL" exit 1 fi echo "OK" # Convert CRL to pem echo -n " Convert CRL: " openssl crl -inform DER -in ${DOMAIN}.crl.der -outform PEM -out ${DOMAIN}.crl.pem echo "OK" # Get all certificates in the chain echo -n " Get all certificates in chain: " OLDIFS=$IFS; IFS=':' certificates=$(openssl s_client -connect ${DOMAIN}:443 -servername ${DOMAIN} -showcerts -tlsextdebug -tls1 2>&1 </dev/null | sed -n '/-----BEGIN/,/-----END/ {/-----BEGIN/ s/^/:/; p}'); for certificate in ${certificates#:}; do echo $certificate >> ${DOMAIN}.chain.pem ; done; IFS=$OLDIFS echo "OK" # Merge local CAs, chain and CRL echo -n " Merge chain and CRL: " cat $LOCALCAFILE ${DOMAIN}.chain.pem ${DOMAIN}.crl.pem > ${DOMAIN}.crl_chain.pem echo "OK" # Finally, check if the cert was revoked echo " Verify certificate:" openssl verify -crl_check -CAfile ${DOMAIN}.crl_chain.pem ${DOMAIN}.cert.pem # Cleanup if [ $KEEPFILES = 0 ]; then rm -f ${DOMAIN}.cert.pem ${DOMAIN}.crl.der ${DOMAIN}.crl.pem ${DOMAIN}.chain.pem ${DOMAIN}.crl_chain.pem fi exit 0
The post Check if the certificate of a domain was revoked appeared first on nethack.
]]>The post CentOS – Set machines IPv6 source address appeared first on nethack.
]]>So i started to find a (more or less) clean and reliable solution to set the correct source IPv6 address on the few machines with multiple IPv6 addresses (Thanks god for SNI support…). As it turned out, that’s not as easy as i thought first.
My very first idea was to use use the source address selection table to do it, because it sounded very promising first. Unfortunately i haven’t found a way to configure it to do what i want.
You can find more informations about it here: Controlling IPv6 source address selection
My second (and finally working) idea was to set an appropriate route, or replace the default root. Replacing the default route may isn’t such a good idea because, if my rule fails to become active for whatever reason, there is not default route for IPv6 anymore at all. So i decided to use 2000::/3 in my routing rule because it’s the only global unicast address space in use at the moment, and should last for some time (Source: IANA – Internet Protocol Version 6 Address Space).
So, the route i need is:
2000::/3 via <gateway> dev <interface> src <source address> metric 1 f.ex. 2000::/3 via 2001:123:456:789::1 dev ens192 src 2001:123:456:789::100 metric 1
To get a persistent rule, i first had a look at the good old “/etc/sysconfig/static-routes-ipv6”. But it does not support to use the “src”-argument we need to set the source address.
Next, “/etc/sysconfig/network-scripts/route6-<interface>”, which is the newer and recommended way to do additional routes these days. And it supports all options an “ip -6 route add…” command would provide, because it simply adds each line within the file to this command. That’s exactly what i need.
I created the file (/etc/sysconfig/network-scripts/route6-ens192 in my case) and added the route:
2000::/3 via 2001:123:456:789::1 dev ens192 src 2001:123:456:789::100 metric 1
Perfect. Restarted the network service, and… Nothing… If i remove the “src”-argument it works, but of course it’s useless without it. It logs an “RTNETLINK answers: Invalid argument” error in /var/log/messages. This happens f.ex. when the source address does not exists on the system. But it should, because this is executed after the IPs are set. But it looks like it isn’t fully active yet.
At the very end of the “ifup-post” script (within /etc/sysconfig/network-scripts/) there’s an additional script which is executed if it’s present:
... if [ -x /sbin/ifup-local ]; then /sbin/ifup-local ${DEVICE} fi
This script does not exist on CentOS machines, so i created it and added the rule with a slight delay before it’s executed:
#!/bin/sh if [[ "$1" == "ens192" ]]; then sleep 1 ip -6 route add 2000::/3 via 2001:123:456:789::1 dev ens192 src 2001:123:456:789::100 metric 1 fi
Don’t forget to make the file executable (as usual with “chmod 750 /sbin/ifup-local”) and you’re ready to go.
That’s enough time to bring up the interface before the route is set. You may have to increase it a bit further depending on the system you use.
The post CentOS – Set machines IPv6 source address appeared first on nethack.
]]>The post Nethack.ch is SSL only now – Let’s Encrypt FTW! appeared first on nethack.
]]>Last week i received access to Let’s Encrypts beta, and therefore was able to generate some certificates which are fully accepted by any modern browser.
Because of that, nethack.ch will be SSL only from now on.
Let’s Encrypt should be GA around the 16th of November 2015. So, get ready to deploy SSL to your sites.
The post Nethack.ch is SSL only now – Let’s Encrypt FTW! appeared first on nethack.
]]>The post Quick tip: VMware vSphere and USB, use xHCI appeared first on nethack.
]]>Copied all the data to the disk on my client and shipped the disk to the second location. There it was attached to a vSphere host directly. Never used USB device on a vSphere host directly before, but knew that it works.
So i added a “EHCI+UHCI” controller to the VM and attached the USB disk. Fine… Well… Not that fine. A transfer rate of 5-6MB/s isn’t fine at all. Even for a cheap USB disk.
Stopped the copy process, removed the device and controller from the VM and added an xHCI controller instead of the “EHCI+UHCI”. And now, 30MB/s. Much better!
Conclusion:
Always use a xHCI USB controller if you have to attach a USB device to a VM which needs performance.
The post Quick tip: VMware vSphere and USB, use xHCI appeared first on nethack.
]]>The post Quick tip: Download all pdf files on a website appeared first on nethack.
]]>But right-click each of the 30 links and click “save as” definitely wasn’t the way to go. Administrators are lazy guys…
URL of the documentation page: https://access.redhat.com/site/documentation/en-US/Red_Hat_Enterprise_Linux/
NOTE: Little disadvantage on this particular page:
The URL contains the links to the documentations of all RHEL versions, from 2.1 to 7, but only shows the version which is selected on the left. Luckily, it starts to download the files from top to bottom, and RHEL 7 links are on the top. I just watched the downloaded files and hit Ctrl+C as soon all documents i need have been downloaded.
Using “wget”, this is a simple task:
wget -e robots=off -np -nd -A ".pdf" -r -l1 https://access.redhat.com/site/documentation/en-US/Red_Hat_Enterprise_Linux/
Options used:
The post Quick tip: Download all pdf files on a website appeared first on nethack.
]]>The post Quick tip: Flush OS X Mavericks plist file cache appeared first on nethack.
]]>Now you can reload the plist file manually:
defaults read [bundle identifier] # f.ex. for Jitsi defaults read org.jitsi.plist # Full path works too defaults read /Users/username/Library/Preferences/org.jitsi.plist
Or delete the cached one (Not tested myself!):
defaults delete org.jitsi.plist
The post Quick tip: Flush OS X Mavericks plist file cache appeared first on nethack.
]]>The post Increase SSL and TLS security on nginx and Apache by enabling PFS and HSTS appeared first on nethack.
]]>The default configuration of SSL is fine on most Linux distributions (you will get an A-Rating at SSL Labs), but still could be done a lot better and more secure.
Goals we want to achieve:
NOTE: the configuration below will break SSL/TLS communication with IE6 and Java6, because it’s simply not possible to have secure communication with them. This configuration is about security and not compatibility.
In the default repositories nginx in version 1.0.15 is included, which should support PFS. But, it doesn’t. Why that? It’s because nginx is static linked to an older openssl library, and therefore doesn’t support required ciphers. ECC and ECDHE ciphers are supported in OpenSSL 1.0.1c+.
But luckily, nginx has an official repository which provides more recent versions for CentOS. To add their repo and install nginx execute these commands:
wget http://nginx.org/packages/centos/6/noarch/RPMS/nginx-release-centos-6-0.el6.ngx.noarch.rpm rpm -ivh nginx-release-centos-6-0.el6.ngx.noarch.rpm yum install nginx
Unfortunately Apache 2.2 doesn’t support PFS at all. The solution is to configure nginx as a reverse proxy because it supports everything we need, it’s done quickly, and we don’t really lose much performance. PFS is supported in Apache 2.4+.
To have a more secure DH key exchange we have to generate a DH parameter file with a size of 2048 or 4096 bits (this will take some time!):
openssl dhparam -out /etc/pki/tls/private/dhparam.pem 2048 chmod 600 /etc/pki/tls/private/dhparam.pem
Global config for all sites (/etc/nginx/nginx.conf):
http { .... # Only allow save protocols ssl_protocols TLSv1 TLSv1.1 TLSv1.2; # Prefer server side protocols for SSLv3 and TLSv1 ssl_prefer_server_ciphers on; # PCI compilant ciphers ssl_ciphers "EECDH+ECDSA+AESGCM EECDH+aRSA+AESGCM EECDH+ECDSA+SHA384 EECDH+ECDSA+SHA256 EECDH+aRSA+SHA384 EECDH+aRSA+SHA256 EECDH+aRSA+RC4 EECDH EDH+aRSA RC4 !aNULL !eNULL !LOW !3DES !MD5 !EXP !PSK !SRP !DSS"; # FIPS ready ciphers only #ssl_ciphers "EECDH+ECDSA+AESGCM EECDH+aRSA+AESGCM EECDH+ECDSA+SHA384 EECDH+ECDSA+SHA256 EECDH+aRSA+SHA384 EECDH+aRSA+SHA256 EECDH+aRSA+RC4 EECDH EDH+aRSA DES-CBC3-SHA !RC4 !aNULL !eNULL !LOW !MD5 !EXP !PSK !SRP !DSS !CAMELLIA !SEED"; # SSL session cache ssl_session_cache shared:SSL:10m; ssl_session_timeout 10m; # For Diffie Hellman Key Exchange: # Create dhparam.pem: openssl dhparam -out dhparam.pem 2048 ssl_dhparam /etc/pki/tls/private/dhparam.pem; .... }
Setting for HSTS has to be done in server section or it will not work (at least in my case):
server { .... # Enable HSTS (HTTP Strict Transport Security) add_header Strict-Transport-Security "max-age=15768000;includeSubDomains"; .... }
Now, if you use nginx only, configure your virtual hosts as usual.
If you’re using nginx as a reverse proxy for Apache, add the following config:
Site specific configuration (f.ex. /etc/nginx/conf.d/default.conf):
server { .... proxy_next_upstream error timeout invalid_header http_500 http_502 http_503 http_504; # Set headers proxy_set_header Accept-Encoding ""; proxy_set_header Host $host; proxy_set_header X-Real-IP $remote_addr; proxy_set_header X-Forwarded-For $proxy_add_x_forwarded_for; # Most PHP, Python, Rails, Java App can use these headers proxy_set_header X-Forwarded-Proto $scheme; add_header Front-End-Https on; # Disbale redirect proxy_redirect off; # Depending on your configuration, you may want to place the location in separate files location / { proxy_pass http://127.0.0.1:80; } .... }
A bit off topic, but you definitely want to have compression enabled:
Global config for all sites (/etc/nginx/nginx.conf):
http { .... gzip on; gzip_disable "msie6"; gzip_comp_level 6; gzip_min_length 1100; gzip_buffers 16 8k; gzip_proxied any; gzip_http_version 1.1; gzip_types text/plain application/xml text/css text/js text/xml application/x-javascript text/javascript application/json application/xml+rss; ....
BEAST is a purely client-side vulnerability. When this attack became public, there was the possibility to mitigate the attack on the server side. But in the meantime all common browser have fixed it and therefore it’s not needed to mitigate it on server-side anymore. Read more about BEAST attacks.
1024 bit keys are broken. If you sill use them somewhere, replace them by bigger ones as soon as possible.
2048 bit keys are still secure and it’s the minimum key length that should be used. Should be save for some more years.
4096 bit keys are the most secure option and should be secure for many more years. But also uses more CPU and decreases performance a bit.
I personally have started to use 4094 bit keys only since last quarter of 2013, but don’t replace smaller ones until i have to replace them anyway.
Some smartcards and other devices may not support 4096 yet. You can find some further informations here.
Finally you have to check if everything was configured correctly.
Test your site at SSL Labs.
The post Increase SSL and TLS security on nginx and Apache by enabling PFS and HSTS appeared first on nethack.
]]>The post Change host name of Puppet client appeared first on nethack.
]]>On the client side stop Puppet, remove old certificates and change host name:
service puppet stop find /var/lib/puppet/ssl -type f -print | xargs rm -v
Change the host name in /etc/sysconfig/network and /etc/hosts, then reboot the client.
Remove the old certificate on the server:
puppet cert clean hostname.domain.tld
If you’re using Foreman, change the host name there too.
Finally, initialize a manual update on the client:
puppet agent --waitforcert 60 --test
and sign the new certificate as usual:
puppet cert list puppet cert sign hostname.domain.tld
The post Change host name of Puppet client appeared first on nethack.
]]>