How to use OpenVPN over an IP over ICMP tunnel (Hans)

Introduction

The very first question may is why to tunnel IP over ICMP at all?

Sometimes you may find yourself in a situation where you have network, but no access to the Internet because of annoying restrictions. That f.ex. could be a proxy which requires authentication, a captive portal like in hotels or the ports you need simply are not open. As long you can ping hosts in the Internet you have the possibility to use Hans (IP over ICMP) to get around this restrictions. One problem that still could arise is that the local firewall implements some kind of ICMP flooding protection and your clients is getting blocked because Hans generates too much ICMP traffic (and it will definitely produce quite a lot of them).

IMPORTANT: Hans doesn’t do any encryption! That’s why i want to pipe my OpenVPN connection through it.

How to setup an OpenVPN server with certificates and Two-Factor Authentication you can find in my last post.

This post explains the additional steps required to make it work. So you may should have a look at the post  first before continuing.

Installation

Client

On a Linux system you can compile the client the same way we do for the server in the next step. For OS X and Windows there’s a binary available on the Hans website:  http://code.gerade.org/hans/ .

Server

Download the source, compile it and copy the binary:

wget https://netcologne.dl.sourceforge.net/project/hanstunnel/source/hans-1.0.tar.gz
tar xfz hans-1.0.tar.gz
cd hans-1.0
make

cp hans /usr/local/sbin/

Martin Hundebøll provided a Systemd script to start up the service at boot time, and i modified a bit to fit my needs.

Create the file /etc/systemd/system/hans.service and add this:

[Unit]
Description=ICMP Tunneling Daemon
After=syslog.target network.target

[Service]
Type=forking
EnvironmentFile=/etc/hans/hans.conf
Restart=on-abort

ExecStart=/usr/local/sbin/hans -s $HANS_IP -d $HANS_DEV -m $HANS_MTU -u $HANS_USER -p $HANS_PASS

[Install]
WantedBy=multi-user.target

Configuration

Hans server

Put the following content into /etc/hans/hans.conf :

HANS_IP=10.22.33.0
HANS_DEV=tun99
HANS_USER=nobody
HANS_PASS=<a not to short password>
HANS_MTU=1500

HANS_IP: A subnet which is used within the tunnel for communication (make sure that it’s different from your existing OpenVPN subnets)
HANS_DEV: The tun device it should use. As i use lower tun numbers for OpenVPN i set it to tun99

Because the configuration contains the password in plain text, make it readable by root only:

chown root:root /etc/hans/hans.conf
chmod 600 /etc/hans/hans.conf

Now enable and start Hans:

systemctl enable hans
systemctl restart hans

Hans client

To start it up on my Mac i use this simple command:

sudo ./hans -c your.server.com -m 1500 -p <the password you defined on the server>

Now you should be able to ping the server side:

ping 10.22.33.1

OpenVPN Server

If your IP over ICMP tunnel is up, it’s time to configure OpenVPN.

It turned out that it was not as easy than i thought first because there are two tunnels involved and they begin to interfere with each other if the routing is not set correctly.

DISCLAIMER: I don’t know if the solution below is the best, but it was the only one which made my setup work the way i want. If you found a better solution, please add a comment below.

I had to make a separate OpenVPN configuration which doesn’t forward everything through the tunnel because this killed the IP over ICMP tunnel. The only change to the original OpenVPN configuration i used in my last post  was to comment out the line which pushes the default route to the client:

# push "redirect-gateway def1 bypass-dhcp"

NOTE: Make sure to have a different IP range, port and tun device configured as explained it the post mentioned above, as well as set all firewall rules (masquerading).

Fire up the new instance of the OpenVPN service and then the last thing we have to do is the client config.

OpenVPN client

There are three options which are different from the configuration used for a normal OpenVPN connection. Please, again, have a look at the previous post for details.

The options you have to change are:

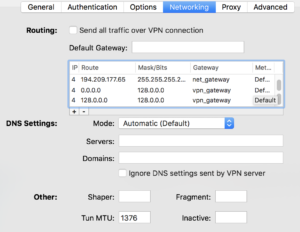
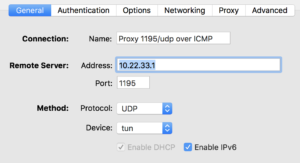
  • IP/Port: 10.22.33.1 (The address of the IP over ICMP tunnel on the server side, and 1195 as port in my case)
  • Tun MTU: For better performance, set the MTU of the OpenVPN connection to 1376 (or maybe even a bit lower)
  • Routes: In my Viscosity VPN client i can set additional routes directly. I had to add three of them:
    • Route: <external IP of Hans server>/32, Gateway: net_gateway (which is a variable to the local gateway in Viscosity)
    • Route: 0.0.0.0/1, Gateway: vpn_gateway (which is a variable to the VPN gateway address in Viscosity)
    • Route: 128.0.0.0/1, Gateway: vpn_gateway
 

The last two routes are a bit special and a little workaround. Let me explain:
If i overwrite the default route in any way i tried, it broke the IP over ICMP tunnel. So i created two /1 networks which cover all IPv4 adresses, and because they are smaller than the default route (0.0.0.0/0) they have a higher priority. I’m sure there’s a better and cleaner way to do it, but i wasn’t able to find out how.

Now you should be able to connect your OpenVPN tunnel through the IP over ICMP tunnel. I could achieve up to 5 MBit/s which isn’t very much, but not too shabby if the other option would be to have no Internet at all or to have to pay for it…
Posted in CentOS, Linux, Mac, OpenVPN, VPN | Tagged , | 5 Comments

Setup an OpenVPN server with certificate and two-factor authentication on CentOS 7

Introduction

My goal was to have an OpenVPN server running, to which i can connect using different ports and by pipping it over an IP over ICMP tunnel (the latter will follow in another post).

Ports i want to use:

  • 1194/udp – The default OpenVPN port
  • 53/udp – If im lucky and the network has DNS open by default…
  • 1195/udp – A local port i use when pipping it over an ICMP tunnel (requires a slightly modified config and is not part of this tutorial)

You may also want to add port 443/tcp for example as another option. This is quite easy to achieve thanks to Systemd on CentOS 7.

Installation

First make sure you have the EPEL repository installed (i’m sure you will find out how).

SELinux

(If you now think about disabling SELinux, stop here and install Windows…)

Allow the OpenVPN service to run on another than the default port (53/udp in my case):

semanage port -a -t openvpn_port_t -p udp 53

To view which ports are currently allowed use this command:

semanage port -l | grep openvpn_port_t

Install required packages

Simpel:

yum install openvpn easy-rsa

Certificates

cd /etc/openvpn
mkdir rsa
cp -rf /usr/share/easy-rsa/2.0/* /etc/openvpn/rsa

Set all the values needed to generate the certificates within /etc/openvpn/rsa/vars:

export KEY_SIZE=4096
export CA_EXPIRE=3654
export KEY_EXPIRE=3654
export KEY_COUNTRY="CH"
export KEY_PROVINCE="ZH"
export KEY_CITY="City"
export KEY_ORG="Organization"
export KEY_EMAIL="me@example.com"
export KEY_OU=""
export KEY_NAME="Cert Name"

Load the values we just set and build all the certificates we need:

source ./vars
./clean-all
./build-ca
./build-key-server server
./build-dh
./build-key <username>

OpenVPN configuration

cd /etc/openvpn
# Choose a config name which represents the settings you will use (you will have to copy this config later if you want to have it running on other ports)
cp /usr/share/doc/openvpn-2.3.13/sample/sample-config-files/server.conf /etc/openvpn/port1194udp.conf

Now open the OpenVPN configuration (/etc/openvpn/port1194udp.conf) and set all these values:

port 1194
proto udp6 # If you have and want to use IPv6
dev tun12 # Set an approriate number (i use the same as for the third octet of the IPv4 addressed used WITHIN the tunnel)
ca rsa/keys/ca.crt
cert rsa/keys/server.crt
key rsa/keys/server.key # This file should be kept secret
dh rsa/keys/dh4096.pem
server 10.11.12.0 255.255.255.0-0 # The subnet which is used within the tunnel (will be NAT'ed later)
push "redirect-gateway def1 bypass-dhcp" # Route all the traffic through the tunnel
push "dhcp-option DNS 208.67.222.222" # DNS servers to use after connection
push "dhcp-option DNS 208.67.220.220"

# The IPv6 subnet used within the tunnel
server-ipv6 2001:aaaa:bbbb:12::/64
tun-ipv6
push tun-ipv6
ifconfig-ipv6 2001:aaaa:bbbb:12::1 2001:aaaa:bbbb:12::2

# Push two IPv6 routes to route all the IPv6 traffic through the tunnel (::/0 will not work in most cases)
push "route-ipv6 8000::/1"
push "route-ipv6 ::/1"

# Only works if you have OpenVPN >= 2.4 (not tested as i use 2.3.x at the moment)
# push "dhcp-option DNS6 2620:0:ccc::2"
# push "dhcp-option DNS6 2620:0:ccd::2"

cipher AES-256-CBC
comp-lzo

user openvpn
group openvpn

# Use PAM to validate the user and check the two-factor authentication<
plugin /usr/lib64/openvpn/plugins/openvpn-plugin-auth-pam.so openvpn

Firewall

(If you want to install iptables, seriously, think about to move to Windows… 😉 )

Open the ports used for OpenVPN (The ones YOU finally will use):

firewall-cmd --permanent --add-service=openvpn
firewall-cmd --permanent --add-port=53/udp # Or --add-service=dns
firewall-cmd --permanent --add-masquerade

# For IPv6 (replace "ens192" with your interface name and "tun0" with your "tunX" interface name)
firewall-cmd --direct --add-rule ipv6 nat POSTROUTING 0 -o ens192 -j MASQUERADE
firewall-cmd --direct --add-rule ipv6 filter FORWARD 0 -i tun0 -o ens192 -j ACCEPT
firewall-cmd --direct --add-rule ipv6 filter FORWARD 0 -i ens192 -o tun0 -m state --state RELATED,ESTABLISHED -j ACCEPT
firewall-cmd --reload

Forwarding

Add the following config to /etc/sysctl.conf:

net.ipv4.ip_forward = 1
net.ipv6.conf.all.forwarding = 1

And apply it:

sysctl -p

Google Authenticator

There’s no Google Authenticator package available for CentOS 7 (end 2016), but the package from Fedora 23 works just fine (check for the most current version!)

wget http://mirror.switch.ch/ftp/pool/4/mirror/fedora/linux/releases/23/Everything/x86_64/os/Packages/g/google-authenticator-1.0-0.gita096a62.fc23.5.x86_64.rpm
yum install google-authenticator*

NOTE: Use the user and settings exactly as described below. PAM is very very sensible to wrong permissions and will block authentication if permissions and users are not set correctly.

Add the user to run google-authenticator as and set the correct permissions:

useradd gauth
mkdir /etc/openvpn/google-authenticator
chown gauth:gauth /etc/openvpn/google-authenticator && chmod 700 /etc/openvpn/google-authenticator

To allow updates of the users Google Authenticator config we have to set this additional SELinux context:

semanage fcontext -a -t openvpn_etc_rw_t -ff '/etc/openvpn/google-authenticator(/.*)?'

To make generating of Google Authenticator codes easier i wrote this script (/root/create-gauth.sh):

#!/bin/sh

# Parse arguments
USERNAME="$1"

if [ -z "$USERNAME" ]; then
  echo "Usage: $(basename $0) <username>"
  exit 2
fi

# Set the label the user will see when importing the token:
LABEL='OpenVPN Server'

su -c "google-authenticator -t -d -r3 -R30 -W -f -l \"${LABEL}\" -s /etc/openvpn/google-authenticator/${USERNAME}" - gauth

Make it executable:

chmod 700 /root/create-gauth.sh

Create a new user and its password, and generate the GA token:

useradd -s /sbin/nologin <username>
passwd <username>

/root/create-gauth.sh <username>

The output will be like this:

https://www.google.com/chart?chs=200x200&chld=M|0&cht=qr&chl=otpauth://totp/OpenVPN%2520Server%3Fsecret%3DZXHPDSSKDGTWFEPE</p>

<QR Code>

Your new secret key is: YAHTTODJA2XGMUXM
Your verification code is 336641
Your emergency scratch codes are:
20222169
93516211
27775127
19957829
95145865

Install the GA token using the QR code or entering the secret manually.

PAM

Create the file /etc/pam.d/openvpn and add this configuration:

#%PAM-1.0
auth [user_unknown=ignore success=ok ignore=ignore default=bad] pam_securetty.so
auth required /lib64/security/pam_google_authenticator.so secret=/etc/openvpn/google-authenticator/${USER} user=gauth forward_pass
auth include system-auth
account include system-auth
password include system-auth

Services

Enable and start OpenVPN:

systemctl enable openvpn@port1194udp.service
systemctl start openvpn@port1194udp.service

Test it

Now it’s time to test if everything works fine.

Copy all required certificates to your client (“ca.crt”, “<username>.key” and “<username>.crt”).

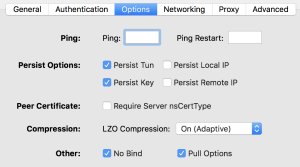
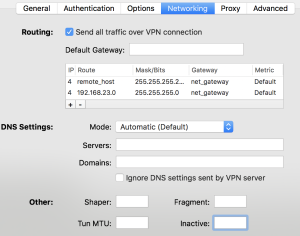
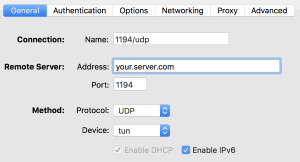
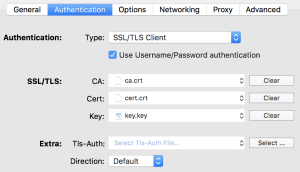
Create a new OpenVPN config on your client, add the certificates and modify the config as i have it in my Viscosity client:
NOTE: 192.168.23.0 is my local network i don’t want to be routed through the tunnel.
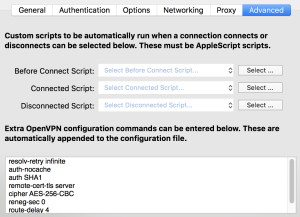
OpenVPN Settings - General OpenVPN Settings - Authentication OpenVPN Settings - Options OpenVPN Settings - Networking OpenVPN Settings - Proxy OpenVPN Settings - Advanced

NOTE: To enter the GA token you have to enter you password followed by the code (<password><token>)
Now try to connect and hope everything is fine. If the authentication fails, check these logs:

  • /var/log/audit/audit.log
  • /var/log/secure

Additional ports

If you want to run it on multiple ports you can do two things:

  1. Simply NAT different external ports to the same port (1194/udp) behind your firewall. This works fine if you can use the same configuration for all of them.
  2. If you want to be able to use UDP and TCP in parallel, or the configuration has to be different in any other way (f.ex. if using an additional ICPM tunnel in my case) you have to run multiple instances with different configurations.

Tasks you have to do to have an additional instance:

  • Copy the configuration (f.ex. to “port53udp.conf”) and change the port and whatever else you want to change
    IMPORTANT: Also change the tunX number and the IPv4 and IPv6 addresses (f.ex. to 10.11.13.0 / 2001:aaaa:bbbb:13::X)
  • Allow OpenVPN to run on this port (see “semanage” commands above)
  • For IPv6 add the required firewalld rules (see “firewall-cmd” commands above)
  • Enable and start the additional service (f.ex. “openvpn@port53udp.service”, simply use the new configuration name behind the @)
  • Copy your config on your client and make the changes there too
Posted in CentOS, Firewalls, Linux, OpenVPN, Security, VPN | Tagged , , | 2 Comments

Check if the certificate of a domain was revoked

Just had the need to quickly check if the certificate of a domain was revoked or not, and found this tutorial:  OpenSSL: Manually verify a certificate against a CRL

Well done, but two problems:

  • If the server doesn’t send all certificates (including the root CA), the verify process will fail
  • Too much to type…

So i quickly created a bash script to address these issues and do all the stuff much more easily.

It takes one to three options:

  • <domain>: The domain you want to check (f.ex. “google.com”)
  • <keepfiles>: (Optional) 0 or 1. Keep all the certs and don’t clean it up at the end (it creates all files in you current folder as <domain>.yyy.zzz)
  • <trusted CA file>: (Optional) The path to the file containing the locally installed/trusted CAs. On CentOS/Fedora it automatically uses “/etc/pki/tls/certs/ca-bundle.crt”. If you get an error like “error 2 at 2 depth lookup:unable to get issuer certificate” you very likely have to specify it.

Download:  checkcertcrl.sh

#!/bin/bash

if [ -z "$1" ]; then
    echo "Usage: $0 <domain> [<keepfiles (0/1)>] [<trusted CA file bu<a href="https://nethack.ch/wp-content/uploads/2016/08/checkcertcrl.sh_.gz" rel="">checkcertcrl.sh</a>ndle path>]"
    exit 1
fi
DOMAIN=$1

KEEPFILES=0
if [ "$2" = "1" ]; then
    KEEPFILES=1
fi

LOCALCAFILE=""
if [ ! -z "$3" ] && [ ! -f "$3" ]; then
    echo "ERROR: The file \"${3}\" does not exists. It must point to a file containing your local trusted CAs. For CentOS f.ex. it's \"/etc/pki/tls/certs/ca-bundle.crt\" by default."
    exit 1
else
    if [ -z "$3" ]; then
        # Check if the default CentOS CA bundle exists and use this if no other file was specified
        if [ -f "/etc/pki/tls/certs/ca-bundle.crt" ]; then
            LOCALCAFILE="/etc/pki/tls/certs/ca-bundle.crt"
        fi
    else
        LOCALCAFILE="$3"
    fi
fi

# Get the domain certificate
echo -n "   Get domain certificate: "
openssl s_client -connect ${DOMAIN}:443 -servername ${DOMAIN} 2>&1 < /dev/null | sed -n '/-----BEGIN/,/-----END/p' > ${DOMAIN}.cert.pem
echo "OK"

echo -n "   Get the CRL file: "
# Get CRL URL from cert and download it
CRLURL=`openssl x509 -noout -text -in ${DOMAIN}.cert.pem | grep -A 4 'X509v3 CRL Distribution Points' | grep URI | cut -d':' -f 2-10`

# Check if a CRL URL was returned and exit if not
if [ "$CRLURL" = "" ]; then
    echo -e "ERROR: No CRL URL found in certificate. Verification not possible.\n      Could be that it's OCSP only."
    exit 1
fi

wget --quiet -O ${DOMAIN}.crl.der $CRLURL

if [ $? -ne 0 ]; then
    echo "ERROR: Failed to download CRL"
    exit 1
fi
echo "OK"

# Convert CRL to pem
echo -n "   Convert CRL: "
openssl crl -inform DER -in ${DOMAIN}.crl.der -outform PEM -out ${DOMAIN}.crl.pem
echo "OK"

# Get all certificates in the chain
echo -n "   Get all certificates in chain: "
OLDIFS=$IFS; IFS=':' certificates=$(openssl s_client -connect ${DOMAIN}:443 -servername ${DOMAIN} -showcerts -tlsextdebug -tls1 2>&1 </dev/null | sed -n '/-----BEGIN/,/-----END/ {/-----BEGIN/ s/^/:/; p}'); for certificate in ${certificates#:}; do echo $certificate >> ${DOMAIN}.chain.pem ; done; IFS=$OLDIFS
echo "OK"

# Merge local CAs, chain and CRL
echo -n "   Merge chain and CRL: "

cat $LOCALCAFILE ${DOMAIN}.chain.pem ${DOMAIN}.crl.pem > ${DOMAIN}.crl_chain.pem
echo "OK"

# Finally, check if the cert was revoked
echo "   Verify certificate:"
openssl verify -crl_check -CAfile ${DOMAIN}.crl_chain.pem ${DOMAIN}.cert.pem


# Cleanup
if [ $KEEPFILES = 0 ]; then
    rm -f ${DOMAIN}.cert.pem ${DOMAIN}.crl.der ${DOMAIN}.crl.pem ${DOMAIN}.chain.pem ${DOMAIN}.crl_chain.pem
fi

exit 0
Posted in Bash, Linux, Security, SSL/TLS | Tagged , , , , , , | Leave a comment

CentOS – Set machines IPv6 source address

If you have configured multiple IPv6 addresses within a CentOS machine, it shows the strange behavior that it sets the last IPv6 address in IPV6ADDR_SECONDARIES as its default source address for outgoing connections, which can end up in quite annoying problems. For example, firewalls may expects the main IPv6 address and not a secondary, which changes if you add another one and don’t think about it to not add it at the end. Nothing you would like to have on a production system.

So i started to find a (more or less) clean and reliable solution to set the correct source IPv6 address on the few machines with multiple IPv6 addresses (Thanks god for SNI support…). As it turned out, that’s not as easy as i thought first.

My very first idea was to use use the source address selection table to do it, because it sounded very promising first. Unfortunately i haven’t found a way to configure it to do what i want.
You can find more informations about it here: Controlling IPv6 source address selection

My second (and finally working) idea was to set an appropriate route, or replace the default root. Replacing the default route may isn’t such a good idea because, if my rule fails to become active for whatever reason, there is not default route for IPv6 anymore at all. So i decided to use 2000::/3 in my routing rule because it’s the only global unicast address space in use at the moment, and should last for some time (Source: IANA – Internet Protocol Version 6 Address Space).

So, the route i need is:

2000::/3 via <gateway> dev <interface> src <source address> metric 1
f.ex.
2000::/3 via 2001:123:456:789::1 dev ens192 src 2001:123:456:789::100 metric 1

To get a persistent rule, i first had a look at the good old “/etc/sysconfig/static-routes-ipv6”. But it does not support to use the “src”-argument we need to set the source address.

Next, “/etc/sysconfig/network-scripts/route6-<interface>”, which is the newer and recommended way to do additional routes these days. And it supports all options an “ip -6 route add…” command would provide, because it simply adds each line within the file to this command. That’s exactly what i need.

I created the file (/etc/sysconfig/network-scripts/route6-ens192 in my case) and added the route:

2000::/3 via 2001:123:456:789::1 dev ens192 src 2001:123:456:789::100 metric 1

Perfect. Restarted the network service, and… Nothing… If i remove the “src”-argument it works, but of course it’s useless without it. It logs an “RTNETLINK answers: Invalid argument” error in /var/log/messages. This happens f.ex. when the source address does not exists on the system. But it should, because this is executed after the IPs are set. But it looks like it isn’t fully active yet.

At the very end of the “ifup-post” script (within /etc/sysconfig/network-scripts/) there’s an additional script which is executed if it’s present:

...
if [ -x /sbin/ifup-local ]; then
  /sbin/ifup-local ${DEVICE}
fi

This script does not exist on CentOS machines, so i created it and added the rule with a slight delay before it’s executed:

#!/bin/sh
if [[ "$1" == "ens192" ]]; then
  sleep 1
  ip -6 route add 2000::/3 via 2001:123:456:789::1 dev ens192 src 2001:123:456:789::100 metric 1
fi

Don’t forget to make the file executable (as usual with “chmod 750 /sbin/ifup-local”) and you’re ready to go.

That’s enough time to bring up the interface before the route is set. You may have to increase it a bit further depending on the system you use.

Posted in CentOS, Linux | Leave a comment

Nethack.ch is SSL only now – Let’s Encrypt FTW!

nethack.ch - SSL Certificate Screenshot

Last week i received access to Let’s Encrypts beta, and therefore was able to generate some certificates which are fully accepted by any modern browser.

Because of that, nethack.ch will be SSL only from now on.

Let’s Encrypt should be GA around the 16th of November 2015. So, get ready to deploy SSL to your sites.

Posted in Security | Tagged , , , , | Leave a comment