Introduction
My goal was to have an OpenVPN server running, to which i can connect using different ports and by pipping it over an IP over ICMP tunnel (the latter will follow in another post).
Ports i want to use:
- 1194/udp – The default OpenVPN port
- 53/udp – If im lucky and the network has DNS open by default…
- 1195/udp – A local port i use when pipping it over an ICMP tunnel (requires a slightly modified config and is not part of this tutorial)
You may also want to add port 443/tcp for example as another option. This is quite easy to achieve thanks to Systemd on CentOS 7.
Installation
First make sure you have the EPEL repository installed (i’m sure you will find out how).
SELinux
(If you now think about disabling SELinux, stop here and install Windows…)
Allow the OpenVPN service to run on another than the default port (53/udp in my case):
semanage port -a -t openvpn_port_t -p udp 53
To view which ports are currently allowed use this command:
semanage port -l | grep openvpn_port_t
Install required packages
Simpel:
yum install openvpn easy-rsa
Certificates
cd /etc/openvpn
mkdir rsa
cp -rf /usr/share/easy-rsa/2.0/* /etc/openvpn/rsa
Set all the values needed to generate the certificates within /etc/openvpn/rsa/vars:
export KEY_SIZE=4096
export CA_EXPIRE=3654
export KEY_EXPIRE=3654
export KEY_COUNTRY="CH"
export KEY_PROVINCE="ZH"
export KEY_CITY="City"
export KEY_ORG="Organization"
export KEY_EMAIL="me@example.com"
export KEY_OU=""
export KEY_NAME="Cert Name"
Load the values we just set and build all the certificates we need:
source ./vars
./clean-all
./build-ca
./build-key-server server
./build-dh
./build-key <username>
OpenVPN configuration
cd /etc/openvpn
# Choose a config name which represents the settings you will use (you will have to copy this config later if you want to have it running on other ports)
cp /usr/share/doc/openvpn-2.3.13/sample/sample-config-files/server.conf /etc/openvpn/port1194udp.conf
Now open the OpenVPN configuration (/etc/openvpn/port1194udp.conf) and set all these values:
port 1194
proto udp6 # If you have and want to use IPv6
dev tun12 # Set an approriate number (i use the same as for the third octet of the IPv4 addressed used WITHIN the tunnel)
ca rsa/keys/ca.crt
cert rsa/keys/server.crt
key rsa/keys/server.key # This file should be kept secret
dh rsa/keys/dh4096.pem
server 10.11.12.0 255.255.255.0-0 # The subnet which is used within the tunnel (will be NAT'ed later)
push "redirect-gateway def1 bypass-dhcp" # Route all the traffic through the tunnel
push "dhcp-option DNS 208.67.222.222" # DNS servers to use after connection
push "dhcp-option DNS 208.67.220.220"

# The IPv6 subnet used within the tunnel
server-ipv6 2001:aaaa:bbbb:12::/64
tun-ipv6
push tun-ipv6
ifconfig-ipv6 2001:aaaa:bbbb:12::1 2001:aaaa:bbbb:12::2

# Push two IPv6 routes to route all the IPv6 traffic through the tunnel (::/0 will not work in most cases)
push "route-ipv6 8000::/1"
push "route-ipv6 ::/1"

# Only works if you have OpenVPN >= 2.4 (not tested as i use 2.3.x at the moment)
# push "dhcp-option DNS6 2620:0:ccc::2"
# push "dhcp-option DNS6 2620:0:ccd::2"

cipher AES-256-CBC
comp-lzo

user openvpn
group openvpn

# Use PAM to validate the user and check the two-factor authentication<
plugin /usr/lib64/openvpn/plugins/openvpn-plugin-auth-pam.so openvpn
Firewall
(If you want to install iptables, seriously, think about to move to Windows… 😉 )
Open the ports used for OpenVPN (The ones YOU finally will use):
firewall-cmd --permanent --add-service=openvpn
firewall-cmd --permanent --add-port=53/udp # Or --add-service=dns
firewall-cmd --permanent --add-masquerade

# For IPv6 (replace "ens192" with your interface name and "tun0" with your "tunX" interface name)
firewall-cmd --direct --add-rule ipv6 nat POSTROUTING 0 -o ens192 -j MASQUERADE
firewall-cmd --direct --add-rule ipv6 filter FORWARD 0 -i tun0 -o ens192 -j ACCEPT
firewall-cmd --direct --add-rule ipv6 filter FORWARD 0 -i ens192 -o tun0 -m state --state RELATED,ESTABLISHED -j ACCEPT
firewall-cmd --reload
Forwarding
Add the following config to /etc/sysctl.conf:
net.ipv4.ip_forward = 1
net.ipv6.conf.all.forwarding = 1
And apply it:
sysctl -p
Google Authenticator
There’s no Google Authenticator package available for CentOS 7 (end 2016), but the package from Fedora 23 works just fine (check for the most current version!)
wget http://mirror.switch.ch/ftp/pool/4/mirror/fedora/linux/releases/23/Everything/x86_64/os/Packages/g/google-authenticator-1.0-0.gita096a62.fc23.5.x86_64.rpm
yum install google-authenticator*
NOTE: Use the user and settings exactly as described below. PAM is very very sensible to wrong permissions and will block authentication if permissions and users are not set correctly.
Add the user to run google-authenticator as and set the correct permissions:
useradd gauth
mkdir /etc/openvpn/google-authenticator
chown gauth:gauth /etc/openvpn/google-authenticator && chmod 700 /etc/openvpn/google-authenticator
To allow updates of the users Google Authenticator config we have to set this additional SELinux context:
semanage fcontext -a -t openvpn_etc_rw_t -ff '/etc/openvpn/google-authenticator(/.*)?'
To make generating of Google Authenticator codes easier i wrote this script (/root/create-gauth.sh):
#!/bin/sh

# Parse arguments
USERNAME="$1"

if [ -z "$USERNAME" ]; then
  echo "Usage: $(basename $0) <username>"
  exit 2
fi

# Set the label the user will see when importing the token:
LABEL='OpenVPN Server'

su -c "google-authenticator -t -d -r3 -R30 -W -f -l \"${LABEL}\" -s /etc/openvpn/google-authenticator/${USERNAME}" - gauth
Make it executable:
chmod 700 /root/create-gauth.sh
Create a new user and its password, and generate the GA token:
useradd -s /sbin/nologin <username>
passwd <username>

/root/create-gauth.sh <username>
The output will be like this:
https://www.google.com/chart?chs=200x200&chld=M|0&cht=qr&chl=otpauth://totp/OpenVPN%2520Server%3Fsecret%3DZXHPDSSKDGTWFEPE</p>

<QR Code>

Your new secret key is: YAHTTODJA2XGMUXM
Your verification code is 336641
Your emergency scratch codes are:
20222169
93516211
27775127
19957829
95145865
Install the GA token using the QR code or entering the secret manually.
PAM
Create the file /etc/pam.d/openvpn and add this configuration:
#%PAM-1.0
auth [user_unknown=ignore success=ok ignore=ignore default=bad] pam_securetty.so
auth required /lib64/security/pam_google_authenticator.so secret=/etc/openvpn/google-authenticator/${USER} user=gauth forward_pass
auth include system-auth
account include system-auth
password include system-auth
Services
Enable and start OpenVPN:
systemctl enable openvpn@port1194udp.service
systemctl start openvpn@port1194udp.service
Test it
Now it’s time to test if everything works fine.
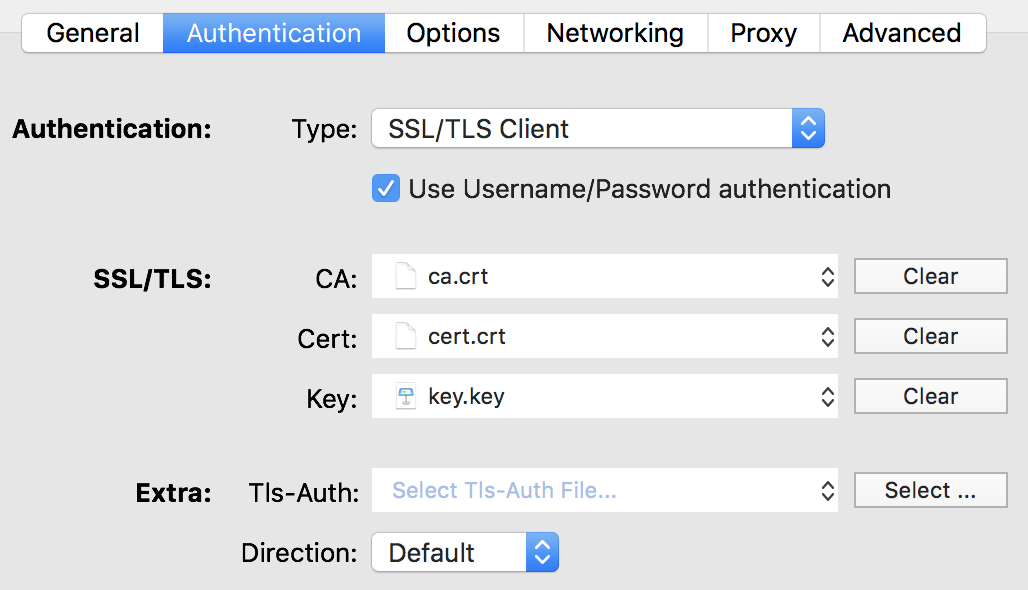
Copy all required certificates to your client (“ca.crt”, “<username>.key” and “<username>.crt”).
Create a new OpenVPN config on your client, add the certificates and modify the config as i have it in my Viscosity client:
NOTE: 192.168.23.0 is my local network i don’t want to be routed through the tunnel.
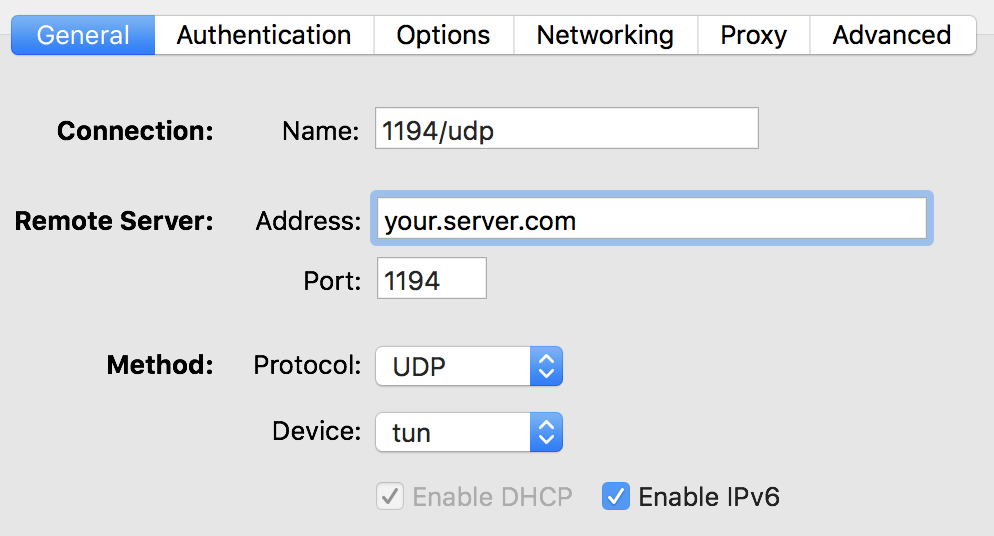


NOTE: To enter the GA token you have to enter you password followed by the code (<password><token>)
Now try to connect and hope everything is fine. If the authentication fails, check these logs:
- /var/log/audit/audit.log
- /var/log/secure
Additional ports
If you want to run it on multiple ports you can do two things:
- Simply NAT different external ports to the same port (1194/udp) behind your firewall. This works fine if you can use the same configuration for all of them.
- If you want to be able to use UDP and TCP in parallel, or the configuration has to be different in any other way (f.ex. if using an additional ICPM tunnel in my case) you have to run multiple instances with different configurations.
Tasks you have to do to have an additional instance:
- Copy the configuration (f.ex. to “port53udp.conf”) and change the port and whatever else you want to change
IMPORTANT: Also change the tunX number and the IPv4 and IPv6 addresses (f.ex. to 10.11.13.0 / 2001:aaaa:bbbb:13::X) - Allow OpenVPN to run on this port (see “semanage” commands above)
- For IPv6 add the required firewalld rules (see “firewall-cmd” commands above)
- Enable and start the additional service (f.ex. “openvpn@port53udp.service”, simply use the new configuration name behind the @)
- Copy your config on your client and make the changes there too
2 Responses to Setup an OpenVPN server with certificate and two-factor authentication on CentOS 7