For a project i had to move quite a lot of data, which is used as an initial seed for replication, to a second location. The best device i could find quickly was a 1TB USB disk. OK, fine…
Copied all the data to the disk on my client and shipped the disk to the second location. There it was attached to a vSphere host directly. Never used USB device on a vSphere host directly before, but knew that it works.
So i added a “EHCI+UHCI” controller to the VM and attached the USB disk. Fine… Well… Not that fine. A transfer rate of 5-6MB/s isn’t fine at all. Even for a cheap USB disk.
Stopped the copy process, removed the device and controller from the VM and added an xHCI controller instead of the “EHCI+UHCI”. And now, 30MB/s. Much better!
Conclusion: Always use a xHCI USB controller if you have to attach a USB device to a VM which needs performance.
After RedHat Enterprise Linux 7 was released this week, which has a bunch of very cool features by the way, I wanted to download all the new documentations as PDF to put them on my iPad.
But right-click each of the 30 links and click “save as” definitely wasn’t the way to go. Administrators are lazy guys…
NOTE: Little disadvantage on this particular page: The URL contains the links to the documentations of all RHEL versions, from 2.1 to 7, but only shows the version which is selected on the left. Luckily, it starts to download the files from top to bottom, and RHEL 7 links are on the top. I just watched the downloaded files and hit Ctrl+C as soon all documents i need have been downloaded.
Using “wget”, this is a simple task:
wget -e robots=off -np -nd -A ".pdf" -r -l1 https://access.redhat.com/site/documentation/en-US/Red_Hat_Enterprise_Linux/
Options used:
-e robots=off (Ignore robots.txt because some pages want to deny fetching the whole page)
-np (Don’t follow links to parent pages)
-nd (Save all files in the current directory instead of creating the whole hierarchy)
-A “.pdf” (Only download files with PDF extension)
My finding of the day while I did a clean install on my MacBook Pro: In OS X Mavericks, Apple started to cache plist files, which results in replacing a plist file manually has no effect until the cache is reloaded automatically. If you open the application which uses this plist file to early, it overwrites your copied file with the old/cached one.
Now you can reload the plist file manually:
defaults read [bundle identifier]
# f.ex. for Jitsi
defaults read org.jitsi.plist
# Full path works too
defaults read /Users/username/Library/Preferences/org.jitsi.plist
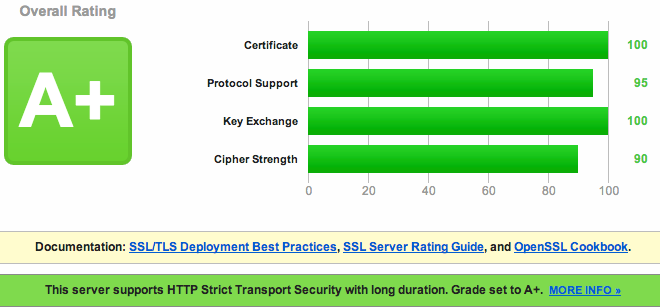
The default configuration of SSL is fine on most Linux distributions (you will get an A-Rating at SSL Labs), but still could be done a lot better and more secure.
NOTE: the configuration below will break SSL/TLS communication with IE6 and Java6, because it’s simply not possible to have secure communication with them. This configuration is about security and not compatibility.
nginx on CentOS 6
In the default repositories nginx in version 1.0.15 is included, which should support PFS. But, it doesn’t. Why that? It’s because nginx is static linked to an older openssl library, and therefore doesn’t support required ciphers. ECC and ECDHE ciphers are supported in OpenSSL 1.0.1c+.
But luckily, nginx has an official repository which provides more recent versions for CentOS. To add their repo and install nginx execute these commands:
Unfortunately Apache 2.2 doesn’t support PFS at all. The solution is to configure nginx as a reverse proxy because it supports everything we need, it’s done quickly, and we don’t really lose much performance. PFS is supported in Apache 2.4+.
Use more secure DH key exchange
To have a more secure DH key exchange we have to generate a DH parameter file with a size of 2048 or 4096 bits (this will take some time!):
Setting for HSTS has to be done in server section or it will not work (at least in my case):
server {
    ....
    # Enable HSTS (HTTP Strict Transport Security)
    add_header Strict-Transport-Security "max-age=15768000;includeSubDomains";
    ....
}
Now, if you use nginx only, configure your virtual hosts as usual. If you’re using nginx as a reverse proxy for Apache, add the following config: Site specific configuration (f.ex. /etc/nginx/conf.d/default.conf):
server {
    ....
    proxy_next_upstream error timeout invalid_header http_500 http_502 http_503 http_504;

    # Set headers
    proxy_set_header Accept-Encoding "";
    proxy_set_header Host $host;
    proxy_set_header X-Real-IP $remote_addr;
    proxy_set_header X-Forwarded-For $proxy_add_x_forwarded_for;

    # Most PHP, Python, Rails, Java App can use these headers
    proxy_set_header X-Forwarded-Proto $scheme;
    add_header Front-End-Https on;

    # Disbale redirect
    proxy_redirect off;

    # Depending on your configuration, you may want to place the location in separate files
    location / {
        proxy_pass http://127.0.0.1:80;
    }
    ....
}
A bit off topic, but you definitely want to have compression enabled: Global config for all sites (/etc/nginx/nginx.conf):
BEAST is a purely client-side vulnerability. When this attack became public, there was the possibility to mitigate the attack on the server side. But in the meantime all common browser have fixed it and therefore it’s not needed to mitigate it on server-side anymore. Read more about BEAST attacks.
What key size should be used?
1024 bit keys are broken. If you sill use them somewhere, replace them by bigger ones as soon as possible. 2048 bit keys are still secure and it’s the minimum key length that should be used. Should be save for some more years. 4096 bit keys are the most secure option and should be secure for many more years. But also uses more CPU and decreases performance a bit.
I personally have started to use 4094 bit keys only since last quarter of 2013, but don’t replace smaller ones until i have to replace them anyway.
Some smartcards and other devices may not support 4096 yet. You can find some further informations here.